Telescope Guide
Telescope Basics
Telescopes are excellent tools for stargazing and getting a good look at fainter objects. Their main job is collect light and focus it onto an eyepiece using lenses or curved mirrors. There are some key concepts to consider then with a telescope.
Objective Lenses and Mirrors
Inside telescopes there are often multiple lenses and mirrors to guide light to the eyepiece you look through. Some may be used to help focus the light more, others to change the direction of he light. The objective is the first surface, or the first lens or mirror that the light hits on this journey and the most important. This is also sometimes called the primary mirror or lens.
Aperture
Aperture is an important factor and refers to the size of the telescope's main lens or mirror. A bigger aperture gives you a brighter image. Common store bought refractors can often be found in the 2 inch range. Typical reflectors are often around 6, 8 or 10 inches.
Focal Length
The focal length of a telescopes is how far from the objective light needs to travel before coming into focus. This is what determines the general shape and length of a telescope tube.
Tube
The telescope tube is the hollow housing of the telescopes optics systems. Most telescopes people would buy for home use will have enclosed tubes which helps protect the mirrors and lenses. Larger and professional grade telescopes usually have more open wireframe tubes for better temperature regulation and to reduce weight.
Eyepieces
The eyepiece is the part of the telescope you look through. You can get different eyepieces of different sizes that will change the magnification. So individual telescopes do not have a set magnification as that is determined by which eyepiece you use. You can also purchase different mounts for cameras that fit into the eyepiece slot for astrophotography.
Finderscope
Telescopes have what looks like a smaller telescope attached on the outside. This is called the finderscope. It has crosshairs and allows you to look at wider field of view in the sky to help you point your telescope.
Mount
This is the structure that the telescope sits on and allows your move the telescope where you want to point and stay at that spot when moving from one object to another. You also use the mount to help make minor adjustments to keep objects in view as the sky appears to rotate.
Types of Telescopes
There are three basic types of telescopes: refracting, reflecting and catadioptric which used either lens, mirrors, or a combination to direct and focus light.
Refractors
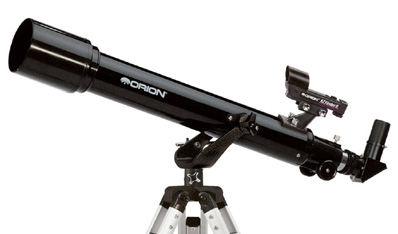
The refractor is the stereotypical telescope that is long and skinny because lenses have longer focal lengths. This was the type Galileo used 400 years ago. Typically the light enters one end of the telescope and is focused by a series of lenses onto an eyepiece on the back of the telescopes.

Pros
Light travels straight through a refractor without being redirected and without obstructions inside the tube. This results in fewer artifacts in the image and a clearer view. This allows for seeing finer detail. Lenses also require less maintenance overall and can stay crisp and clear for longer.
Cons
The longer focal lengths for lenses means there are significant limits on the aperture size before the telescope becomes unwieldy and and less portable. This also makes seeing fainter objects harder.
Reflectors
A reflecting telescope uses curved mirrors and was invented by Sir Isaac Newton and
as such are also called Newtonian telescopes. Mirrors have a shorter focal length
than refractors. They tend to be just as long as most refractors you would purchase,
but they have much bigger apertures for the same length. The eyepiece is usually on
the side near the top rather than at the back. 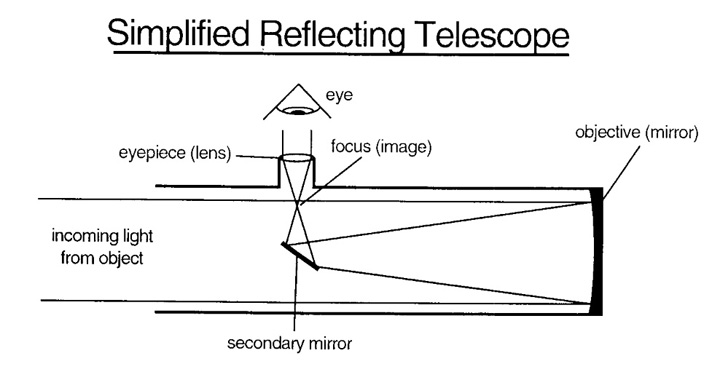
Pros
Curved mirrors are easier to make and so tend to be the most affordable option for a decent telescope. You can get much larger apertures allowing for more light collection in a smaller and more portable package.
Cons
The light travels to the mirror at the back of the the telescope and then reflects secondary angled mirror in the middle of the tube to further focus and redirect the light to the eyepiece on the side. This does interrupt the light and result in some loss of light and distortions in the image. Mirror coatings do wear out over time so they won't last as long as a refractor, but still have a significant life span.
Catadioptrics
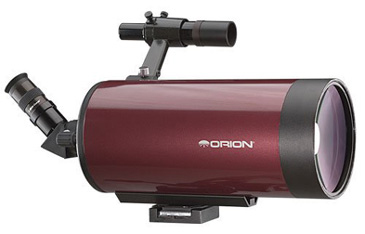
A catadioptric telescope uses mirrors and lenses. They were invented in the 20th century. Catadioptrics or "compound" telescopes tend to be short and fat. The eyepiece is often in the bottom end like a refractor.
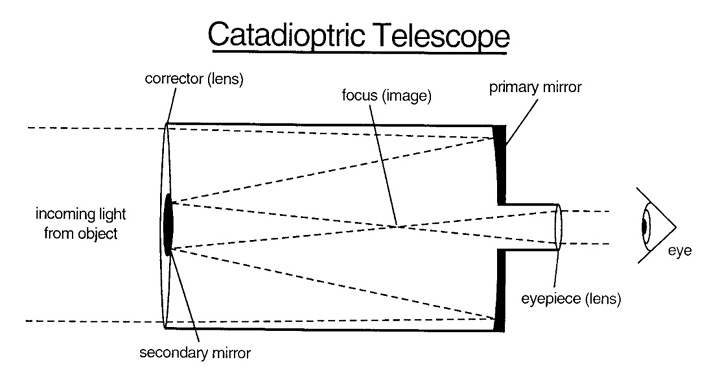
Pros
This design tends to be event shorter than a refractor for the same aperture, making them far more portable. There is also less obstructions and reflection points meaning distortions are reduced compared to a reflector as well.
Cons
These are some of the most expensive telescopes, making cost one of the biggest disadvantages.
Telescope Mounts
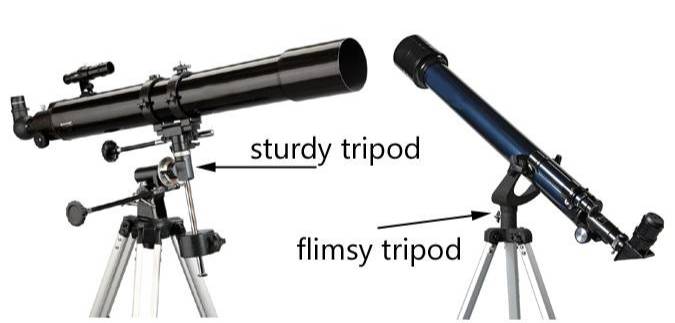
When buying a telescope, a very important thing to consider is the mount. A telescope needs a very sturdy and stable mount. Too often people overlook the mount and end up with a telescope that shakes every time it's touched or every time the wind blows.
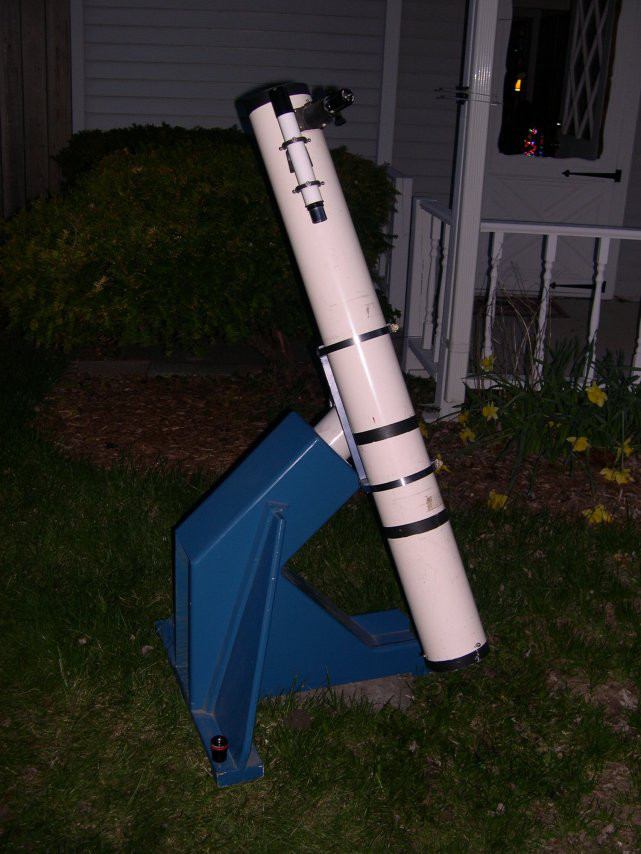
Dobsonian
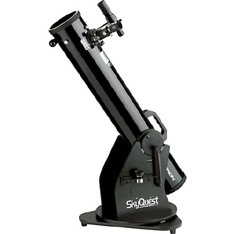
A very popular type of telescope mount is the Dobsonian mount. It was invented in the 1960's by John Dobson. Dobsonian telescopes are almost always Newtonian telescopes in a Dobsonian mount. Many homebuilt telescopes are of the Dobsonian design.
The telescope sits in a cradle where it can rotate up and down on on axis. The cradle sits on top of a lazy-susan to turn around in other directions. This puts the rotation axes in relation to the horizon. It can spin around to different directions along the horizon and then rotate up and down for different altitudes in the sky.
Pros
This mount is fairly easy to set up and use and the way it works it more intuitive. It is also inexpensive and very stable. The height of the eyepiece is great for kids. You can just put it down on the ground and get going.
Cons
The apparent rotation of the sky follows an arc across the sky, so when adjusting the telescope to track objects as they move through the night requires adjusting along two axes. It is also very easy to nudge and lost the object you are looking at.
Equatorial
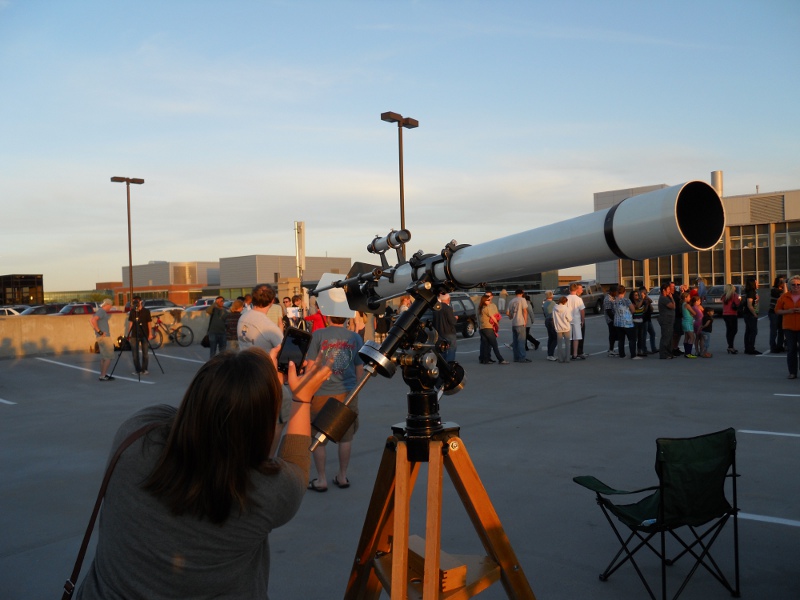
Another type is the equatorial mount. This is angled relative to the ground and sits on a tripod. Because of the angles and relative position a good sturdy equatorial mount will have a heavy counter weight to keep the telescope balanced and stables as you move it.
It is set up to match the rotation of objects in the sky. The sky appears to rotated around us as the Earth rotates. So you can imagine that there is a hollow globe surrounding the Earth rotating around a north pole. That north pole points to the north star and everything rotates around that. You can imagine latitude and longitude lines projected on this globe and this is a our celestial sphere and an equator line in the sky. The mount allows for moving the telescope around and up and down like the dobsonian, except it is relative to this imaginary celestial equator instead of the horizon.
Pros
If you plan on watching the same object for a long time or want to do long exposure astrophotography, you only need to track objects by rotating the telescope in one direction. They often have locks on position and fine adjusters making it harder to lose your object with accidental nudges.
Cons
A good one is more unwieldy because of the counter weight. It also needs to be set up in such a way that you align one axis with the north star and may require more adjustments for different locations. So it is not as intuitive to use.
Calculating Magnification
Magnification is not as important as most people think. The magnification of a telescope is easily changed by changing the eyepiece. Switching to a high power magnification reduces brightness and sharpness. A magnification of 50X is plenty of power to see the phases of Venus, rings of Saturn, moons of Jupiter and craters on the Moon.
Magnifying Power = Objective focal length ÷ Eyepiece focal length
As shown in the formula above , a smaller eyepiece gives you a higher magnification. Theoretically any telescope can be set to any power, but practically speaking there is a limit before the image gets too dim and fuzzy. The maximum theoretical magnification can be estimated by multiplying the aperture (in inches) by 50. So for a 2-inch telescope, the maximum theoretical magnification is about 100 power. A 6-inch scope may be able to go to 300 power. But every time you double the magnification, the brightness drops by 4 times.
The backyard telescope is not just limited by the scope itself but also the sky conditions. When magnifying celestial objects, you're also magnifying the blurring effects of the Earth's atmosphere. So even for big backyard telescopes the practical magnifying limit is really around 250X on a good night, less on a not so steady and clear night. So don't fall for the marketing claims of those cheap flimsy scopes with "400X" printed on the box.
As you magnify you also change the field of view or the size of the portion of the sky you are looking at, The smaller the field of view, the faster objects will move out of view of your telescope.
Computerized Telescopes

A popular type of scope these days are the "Go To" telescopes. These have computerized mounts that allow them to point all by themselves. They're often marketed as a simpler scope, great for a novice. But sometimes that's not true. These scopes normally have to be aligned and calibrated to the sky before use, so you will need some basic knowledge of the stars in the sky.
For some people, part of the fun and joy of a telescope is manually finding the many faint deep-sky objects. Many deep-sky objects just look like faint fuzzy smudges anyhow, so if the scope does all the work it can take away some of the fun. Experienced astro-photographers enjoy the speed and accuracy of a Go To so they can spend less time hunting and more time photographing.
We also now have smart telescopes that connect to app and will take stunning photos of astronomical objects. They do not have eyepieces though and so this takes away from the experience of "seeing" the objects. But you do see more detail with the photos than your eyes can.
It's all a matter of opinion, your goals, and what you hope to get out of a telescope.
Purchasing a Telescope
Where do you buy a telescope these days? Most of the time you'll have to look online. Most of the telescopes found in the "big box" stores are not of good quality. A rule of thumb is that the cost of a decent telescope starts around $200 and goes up from there. Most of the $100 scopes are of poor quality and not worth the money. If you don't want to spend that much, maybe a $50 pair of binoculars is a better choice. There's plenty of amazing celestial wonders that can be seen in binoculars. Some big star clusters even look better in binoculars than in telescopes.
In the end, the best telescope to buy is one you will use. Too often a cheap flimsy scope gets bought and never used because it's too difficult. Or a big expensive scope is bought and never gets used because it's too heavy to lug out to the backyard and set up on a cold night. When choosing a telescope, think about how you plan to use it. Do you like to go camping and hiking? Get one that's more portable. Do you plan of using it on your deck and don't mind storing it by the sliding glass door? Get a big Dob! Perhaps you also like to birdwatch and like to go to the ball game. Get a good pair of binoculars. It's really up to you. Just get something you will use and enjoy.